When it comes to DIY maintenance for your car, changing your own brake pads is one of the easiest ways to save yourself some money. Most main dealers and car garages charge expensive labour rates, and so something as simple as changing your brake pads can set you back hundreds of pounds if you pay someone else to do it. If you do it yourself, not only will you save money, but you will also learn about how cars work and develop some useful skills.
If you’re not confident with changing your own brake pads then it is recommended that you seek the help of someone who is, to make sure that you don’t miss anything vital. We are not mechanics, so please seek professional advice if you wish to undertake this kind of job yourself.
Getting Prepared
Brake pads must always be changed in pairs, that is for both wheels on the same axle. As a result, when you buy a set of front brake pads for your car you will get a set of four pads – two for each side of the car. It’s important that you allow yourself enough time to change the pads on both sides of your car at the same time, as not doing can seriously affect your car’s stopping ability.
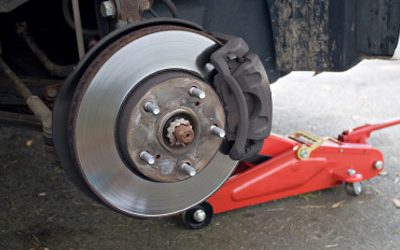
The first thing you need to do is secure your car so you are able to jack it up and remove the road wheel in order to access the brake components. We won’t go into details here, but loosen the wheel nuts slightly, jack up the car and place an axle stand in position before removing the wheel nuts and the road wheel. It’s good practice to store the road wheel underneath the car out of the way.
With the brake components accessible, it’s now time to have a look at the brakes. The two brake pads are held into position by the brake caliper, which itself is made up of two main parts. In order to access the old pads and replace them, the first thing you are going to need to do is move the top part of the caliper out of the way. This is normally done by removing one of the bolts on the back of the slider pins. Don’t forget that if the bolts are facing away from you, then you need to turn them in the opposite direction than if the heads are facing you. (we learned that the hard way once by overtightening a slider pin and snapping it within the caliper). Once you have removed one of the slider pin bolts, the other one can be loosened (but not completely removed) and so the top half of the caliper should be able to open out like a hinge.
Changing the Pads
You will now be able to see the brake pads in situ. Sometimes they will come out very easily, or even fall out when you open up the top half of the caliper. This is often the case if the pads are very worn and well due replacement. However on occasions they will be a bit more difficult to remove so you can use a flat head screwdriver to lever them out. When doing this, be sure to touch the screwdriver on the metal part of the brake pad, not the friction surface itself, as brake dust has been known to cause a large number of health problems.
Once the pads are out, there’s another job that needs to be done before inserting the new pads. The piston in the top half of the caliper would have gradually moved out as the old brake pads wore away, so it needs to be wound back in so that the new, thicker brake pads will fit. This is easily done with a special brake piston rewind tool, or an old-fashioned g-clamp will do if that’s all you’ve got. Before winding the piston back, pop the bonnet and open the cap on the brake fluid reservoir in order to expel any trapped air within the braking system.
Once the piston is wound back, it’s time to fit the new brake pads. Check the box that they come in to see if there are any metal retaining clips. If there are, then use these to replace the old ones which help to hold the pads into the caliper. If there aren’t new ones, then check the old ones are in good condition and reuse or reorder accordingly. Once the retaining clips are in position it’s just a case of putting the brake pads back in the caliper. This can sometimes be tricky, especially if the retaining clips have been bent out of shape. Take your time and keep trying, eventually they will just fall into place.
At this stage once the pads are in position it’s a good idea to apply some copper grease to the back of the metal parts of the pads. This will prevent brake squeal which although harmless can be quite embarrassing. Be sure not to get any copper grease on the brake disc or friction part of the brake pads. When you have applied the copper grease it’s not time to put the top back on the caliper. Ensure you do the calper bolts up to the correct torque, put the cap back on the brake fluid reservoir, replace the road wheel (not forgetting to tighten the wheel nuts), and you’re almost done!
Bedding in
The final stage is to get in the car and depress the brake pedal a few times until it becomes nice and firm. Now you just have to repeat the same process for the other side of the car. Remember that brand new brake pads will have very little braking power during their first few applications. Gently apply your brakes at low speeds a few times to establish some grip before taking your vehicle onto busy roads. Over the first couple of hundred miles your brake pads will be ‘bedding in’, so bare that in mind and only brake hard if you really need to.